Table of contents
Beware, this one’s long, and there’s pix and footnotes, too.
- The theory
- The practice
- The results
- The practice (part II)
- The results (part II)
►The theory
Where the action [1] and the stock of a rifle come together, there is some wiggle room and empty space, here and there, between the two. Fundamentally, ‘bedding’ a rifle means taking up these empty spaces.
Some people claim that the point of bedding is to prevent the action from shifting inside the stock from place to place, from one shot to the next, and messing up your shots.
The thing is, the sights, barrel and receiver are all firmly attached to each other, or should be. They will behave like a single continuous piece of metal and the sights will always line up with the bore, each time you aim a shot, no matter how sloppy things are between the stock and the rest.
There’s still the matter of what happens during the ‘dwell time’ — while the rifle is firing and the bullet is heading through the barrel. It makes sense that a tight fit between the action and the stock will prevent things from shifting during a shot, and make the action and the stock act behave like they’re all one piece. It makes perfect sense that the popular ‘hard’ epoxy bedding will accomplish this.
However, that leaves the problem of barrel vibration, which reduces accuracy.
Some people talk about barrel ‘harmonics’ when they talk about the vibration that comes with firing off a round, but there’s no guarantee that there’s ‘harmony’ in the vibration. Anyone familiar with musical instruments (such as vibrations from a guitar) can tell you that vibration is easy, but harmony doesn’t happen by itself. And in spite of claims that people can ‘tune’ a rifle, and the ‘tuning kits’ available for sale, you can’t really tune a rifle like you can tune a guitar. (That doesn’t stop people from doing some really awesome work on barrel vibrations, though. [2,3,4,5])
My position is, if vibration is bad, skip the harmony–it’s still a kind of wiggling–and focus on reducing *any* vibration. This can be done by bedding the action in a vibration-absorbing material.
If you’re wondering about the value of bedding and vibration, you can do a quick test. Hold the rifle by its grip and hit the fore-end of the stock with the heel of your other hand. If you hear or feel any buzzing/rattling, like I did, you know you have a problem. In fact, I have that on all my 10/22s.
I was initially inspired by a product called Ultra-RVC, and by the measurements done by its inventor that show the differences made by different types of bedding. [3] His measurements demonstrate how badly vibration effects accuracy. Another author/researcher found that an untuned, vibrating 26″ barrel with no stock can vary by 6.0 MOA per millisecond. [4]
The Ultra-RVC product has real fans out there, and one of them sums things up quite nicely: “Ultra-RVC is flexible in that it cures to the consistency similar to that of a standard O-ring, it has give and flexibility that allows it to absorb energy rather than just reflect it.” [6]
Like other bedding materials on the market, Ultra-RVC is an epoxy, and epoxy has issues. Epoxy is kind of touchy when it comes to setting and curing. If you don’t get the recipe right when you mix the batch of epoxy, or if the temperature or humidity aren’t right, you get bad results.
There is an option, though, and luckily, others have tried it with some success. [7] The product is Permatex® RTV Silicone Gasket Maker. [8] It’s meant to do the same thing on a car engine that a regular gasket will. There’s no mixing, it squeezes out of a tube, and cures all by itself in 24 hours under conditions you’d find in your average auto repair shop. It’s also easy to remove excess bedding material after you’re done, working carefully with a razor blade. It’s also vibration-resistant when set and cured. The product is meant to act like a seal in automotive applications, just as O-rings are, and silicone is used to handle vibration in all sorts of situations.
I selected black RTV, thinking that there might be more similarity between black RTV and black O-rings than just the color. If you have a ball made out of black O-ring material (which I used to have) and drop it on the floor, it won’t bounce. Black is also a good color for gun-related things, as most parts suppliers have noticed.
The remaining questions are how much of the action to bed, and how thickly. Controversy rages on some points.
Some people say to bed only the receiver, and an inch or so of the nearest part of the barrel. Beyond that, the action has no contact with the stock. This is called ‘free-floating’ the barrel. One author says this allows the barrel to ‘whip naturally’ during the shot. [9] That’s his term for ‘harmonic vibration’, and ‘natural whipping’ is even less appealing.
An occasional criticism of floating the barrel is that it could lead to the dreaded (and maybe mythical) ‘barrel droop’. This is where the barrel is hanging out there without support, and the force of gravity deflects the barrel downwards ever so slightly. I can see it being a theoretical concern, at best.
A notion related to barrel droop, which is a bit more believable, is that the weight of the ‘floating’ barrel bears downward on the point where the receiver and barrel are attached together, and could cause misalignment between the two. I’d say, don’t use your rifle as a pry bar and you’ll be fine, but in general, putting stress on a place where two parts are joined together is always a bad idea.
There’s one thing you can do that will both absorb as much vibration as you can, and also support the barrel, and that’s bedding it all. One thing I’ve noticed is that the rifles used in national target competition are generally bedded the entire length, and often actually glued on. Likely these guys are onto something.
The final question is, how thick should the bedding be. With ‘hard’ bedding, this isn’t much of an issue. You’re just taking up empty space with bedding material to make a snug fit, and you wind up with one hard surface against another hard surface. When you expect your bedding material to absorb lots of vibration, and do it evenly, things are different. You want to be sure that you have a certain minimum thickness of vibration-absorbing material between the action and the stock wherever the two come together. You’ll see that in the pictorial discussion below.
One thing that troubled me was what to do with the receiver. It’s attached to the barrel tightly enough that it’s part of the vibration situation, and it takes the direct hit for recoil when the rifle is fired. In the article ‘Serious fiddling’, part of my bedding experiment involved cutting a ‘gasket’ of butyl rubber that fit where the takedown screw holds the receiver and stock together. I decided to keep it for the final (at least for now) bedding. It’s essentially a ‘pillar bed’, while the barrel gets its own bedding.
Instead of release agent, I decided to use cling wrap. There’s horror stories out there about guys not getting release agent in all the right places, and didn’t want the risk. It worked well and I highly recommend it.
►The practice
I’ll tell the story of bedding the rifle with a series of pictures and paragraphs.
 Here’s the ‘pillar gasket’ I cut from a piece of butyl rubber, which came from an automobile inner tube. People don’t put inner tubes on cars anymore, but around here, I kept the old ones for uses like this. You never know when you might have to make your own gasket. The thing about butyl rubber is that it absorbs vibration. I know that for a fact. When I was a kid I tried making a slingshot using the stuff. You can pull it back, and it stretches, but when you let go, it just flops down and draws back into its original shape. No zing there at all. The rubber is 0.085″ thick and I cut the center hole with a paper punch. If you can’t find any butyl rubber, look for silicone gasket material. You’ll need something vibration-absorbing with ‘give’ to it, to do what I did.
 Here’s the ‘pillar gasket’ in place, with the takedown screw coming up through the center. One thing I discovered, that I’m very unhappy with, is that the Volquartsen Allen-head takedown screw is shorter than the stock takedown screw. I cannot think of a good reason why Volquartsen would make their replacement screw shorter. In this application, the screw length looked like something to worry about, since the pillar gasket is taking up space and the screw can’t go into the receiver as far as usual. Luckily, I still had the Ruger original stock screw. The screw thing you see coming in from the left, with the eyelet in it, is the forward mounting point for my sling. I discuss the sling in the article ‘First project‘. I’m lucky the end of the screw does not interfere with how the receiver fits into the stock. If I had it to do over again, I’d drill the hole for the sling further forward, dead even with the takedown screw.
 This is the stock in position for bedding. To prepare the barrel channel, I used medium-grit sandpaper to make sure any loose bits of varnish were gone. There’s varnish in there, from the factory, but it’s just overspray. And it’s not stuck on very tight. After sanding, I wiped it down with mineral spirits to remove the flakes and dust. Around here, ‘mineral spirits’ means charcoal lighter fluid, and it works just fine. You’ll notice the blue painter’s masking tape. I taped the pistol grip and everything forward of there, except for the barrel channel. You need at least some tape around the barrel channel to keep the RTV off of the pretty parts of the stock. The reason I did such radical coverage is that I couldn’t know ahead of time if I might have to grab the stock while bedding it and maybe having RTV goop on my hands. The stock is resting on a bench vise that’s partially opened and draped with a shop rag. The point of the rag is to protect the wood finish, and to make sure RTV goop does not fall down into the workings of the vise. All the way on the right you’ll see the internals of my anti-cycloduction buttstock, with the leather upholstery removed.
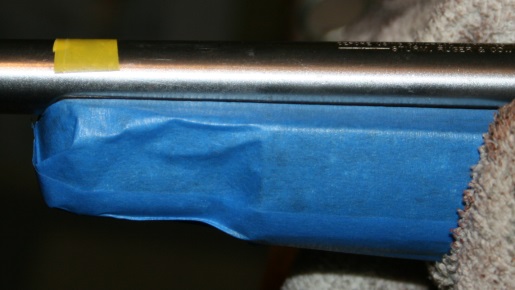 The pillar gasket raises the receiver in the stock, and I wanted to make sure that I have that minimum thickness of vibration-absorbing RTV bedding all the way from the receiver to the far end of the forearm. This is step one, marking where the shim stock will go on the barrel. That’s electrical tape you see, and it’s yellow because I wanted it to show up on photos. Now, the pillar gasket raises the receiver 0.085″, so you want to make sure the barrel gets the same. I kept winding yellow electrical tape around that place on the barrel until it was raised the right distance. The barrel channel is cut a bit narrow, so I didn’t have to add the full 0.085″ thickness of tape. I kept adding tape until the barreled action no longer tipped back and forth in the stock. At the place in the tapered barrel where you see the bit of tape, the barrel diameter measures 0.65″. When I got enough layers of tape around there, I got a diameter of 0.775″.
 Here’s the barrel channel with the RTV dumped in. If you’re bedding a 10/22, you’ll want to look at this picture very, very hard. This looks like a lot of goo, but as it turns out, that’s actually not enough! I figured that amount would make a good bunch of it squirt out around the barrel. It didn’t. Which means, there’s lots of dead space in a 10/22 between the barrel and the stock. If you’re doing this, use more.
After doing this, I laid down one layer of cling wrap on top–the kind of plastic wrap people use for food leftovers. It draped all the way to your left, past the far end of the forearm, and all the way to your right, past where the pillar gasket is. (No, I did not bother worrying about what the thickness of the cling wrap might do.) When you’re looking at this, you can see how the cling wrap would have another effect–keeping the goop away from the receiver. All I wanted for receiver bedding was the pillar gasket.
After the cling wrap was laid, I put the barrel in place, pushed the takedown screw up through the hole in the pillar gasket, and through the cling wrap into the receiver, and tightened it snug. Not way tight, but snug enough to know that the parts were together where they should be, and would be, when I was done. Then I pushed down firmly further up on the barrel, pressing it into the barrel channel. If you did this right, you should see some ooze coming out between the barrel and stock. To keep things clamped together, with even pressure, I wrapped the whole thing with two bungee cords.
 All put together. You can see the yellow tape on the barrel, that’s making sure the barrel doesn’t go too far down into the barrel channel. The cling wrap is obvious, and the bungee cords, too. Earlier testing showed me that a really tight barrel band had the effect of lowering the point of impact when shooting, which means it doesn’t take too much to flex the barrel enough to change how the rifle shoots. So that’s a good reason to use bungee cords for a clamp–it spreads the pressure. And those cords aren’t all that tight, either. Just enough to make sure that the parts don’t shift while the RTV is curing. The package on Permatex black RTV says the cure time is 24 hours.
 Here’s after 24 hours. The barrel is back out, and it separated beautifully from the RTV bedding. Hooray, I didn’t glue the whole thing together. Forget the printing you see in the barrel channel, the makers of the cling wrap decided to print their advertising on it, and that became part of the result. The wrap stuck to the RTV, and not to the rifle, which was the whole point anyhow. But again, look very closely. See the part of the bedding on the right, where it looks wrinkly, instead of smooth, like you see on the left? Well, the wrinkly part is where there was not enough RTV to fill it up all the way. Everything non-wrinkly (about 2/3 of the channel) is fully and firmly bedded. And for that stretch, I had maybe 1/8 of an inch of RTV that squeezed out the side. That’s all! The excess was very easy to trim with an exacto blade, even though I was impressed with its toughness. Bottom line, if you’re doing this, use more goop.
Well, now it’s time to put the rifle back together and see how it shoots. That isn’t going to be totally straight-forward. When doing ‘Serious fiddling‘, I discovered that a really tight barrel band changed the bullet’s point of impact. With the barrel sitting higher in the channel, a too-tight barrel band will be that problem, all over again. What’s more, a too-tight barrel band will defeat some of the purpose of having a semi-flexible, vibration-absorbing bed for the barrel. I’ll want that barrel held oh-so-gently-but-firmly in place, and no more than that. So, before testing, I’ll grind some material away from the inside of the band, on the top, to make more room for the barrel.
►The results
When putting the rifle back together after bedding, the first thing I noticed how nicely and firmly things came together. It was a feeling of things fitting together well. The rifle felt more like ‘one piece’ and I did that test that earlier convinced me the rifle was too ‘loose’ and needed bedding in the first place. Holding the rifle by the pistol grip in my right hand, I hit the forearm with the heel of my left hand. Instead of making a buzzing sort of rattle, it made a solid ‘thunk’.
Shooting the rifle, it felt more solid, too. It felt more like being connected with the bullet, if that makes sense. It was simply more pleasant to shoot.
To make more room for the barrel that now sat higher in the stock, I took the ProMag aluminum barrel band, and with a 1/2″ round file, took a lot of material out of the top of the barrel band where it goes over the top of the barrel. The fit remained far too tight, I couldn’t get it on the the stock even half-way, and I was running out of aluminum to remove.
So I went back and got a Ruger plastic barrel band, and gave it the same treatment. That worked, and it fit snugly.
All the fun ended though, shooting targets. My groups had opened up again. I began without the compensator, and the pillar gasket and barrel band both loose. I tightened them up, and still got large groups. I added the compensator, and still got large groups. I cleaned the barrel, this time with a new BoreSnake, and still got large groups. They weren’t stringing vertically or horizontally, they were just scattered. Go to ‘Serious fiddling’ for a comparison to my last serious shooting attempt.
I was running out of ideas.
For my last attempt of the day, I switched from Remington ‘Golden’ 36-grain brass-plated hollow points, which I had been using, to Remington Subsonic 38-grain lead round-nose.
That gave me a group averaging 0.443, which is a new personal record. (It’s even better than the last time I tried subsonic, and back then, it gave me the same groups as standard velocity.)
I personally think that 0.443 is not bad for a shooting rest and open sights at 30 yards — it’s basically at the very limit of what I’m able to see using those sights. I could probably improve on that group with a scope, but I would settle for my setup, and that sort of group, and say I’m successfully done.
For me, ‘successfully done’ will mean I can stop fiddling with the rifle and focus on the important thing, my offhand shooting skills. That’s when the rifle actually works as the tool it’s meant to be, and the results rely only on the skill of the shooter.
I have a few options left.
a. I can add more RTV bedding material where it didn’t fill up the channel entirely. I have no hypothesis to back this up. It might even be a bad idea. If some bedding is no good, why would more bedding be better?
b. I can try different ammo. I’ve always been suspicious of claims about rifles ‘liking’ different ammo, but switching to subsonic made such a radical improvement that there may be something there after all. The problem with the ammo hypothesis is that I can’t test it. I went to the gun store and yes, they have no 22. None, of any sort at all, just like it’s been for nearly a year.
►The practice (part II)
I chose option (a). The point was to see what bedding could do, and the bedding wasn’t yet complete. Besides, results with subsonic ammo were encouraging. So I continued on.
 In this, you can see the bedding is now complete, all the way back to the receiver. You can see there’s still a wrinkly bit where it didn’t completely pressure-fit against the receiver. (You can also tell what brand of plastic wrap I used.) Lesson learned: look at the picture above where the first dollop of goop is dumped into the barrel channel. That’s about half enough. Go heavier on the receiver end of things.
Also, you’ll notice that the bedding material now overlaps my pillar gasket — which makes it, by virtue of the adhesive power of RTV, a permanent part of the rest of the project. There was a surprise in store for me here. After waiting for 24 hours, I disassembled the project and found that the goop just ahead of the receiver had not yet solidified. Good thing the cling wrap was there to hold it in place! So I reassembled and waited some more, for a total cure time of 36 hours. Turns out there’s a huge amount of empty space ahead of the receiver, between it and the ‘ledge’ of the barrel channel, and huge gobs of RTV take more time to cure. The new RTV attached itself solidly to the old RTV, and the rubbery result is about the consistency of a car tire. Solid!
While scratching my head over the results I got from changing the tightness of the barrel band, I had an idea. What if I could actually ‘tune’ things with an adjustable barrel band? After all, the bedding is flexible, so there may be some opportunities there. And filing aluminum away while hoping for an improvement is just plain not very elegant. So I went and got some hardware.
 Here’s a U-bolt, two nuts, and two straps, all stainless steel, of course, just in case this becomes a permanent feature of the rifle. I took the ProMag barrel band with me to the hardware store to compare sizes with what they had, and got the longer strap just in case I had to widen the U-bolt farther than the small strap would reach. Turns out, I did have to widen the U-bolt, but just by a bit, so the smaller strap worked fine.
 Here’s the U-bolt ‘adjustable barrel band’ installed on the rifle. Okay, so it doesn’t look very stock. And anyone who pays attention will notice it’s a U-bolt. But it looks functional, and functional can be attractive in its own way. If this turns out to be a success, I’ll make a flat spot across the bottom of the forearm for the strap to rest on.
Now it’s time to put the trigger group back in (did I mention, please remove the trigger group before bedding?) and see how it shoots.
►The results (part II)
Okay, so here’s the next set of results, shooting at 30 yards. The barrel is fully bedded, the pillar gasket is in place (it can’t go anywhere anyhow), and the adjustable barrel band is ready to go.
- Takedown barely tight, no barrel band: 1.0375″
- Takedown still barely tight, nuts on barrel band finger tight: 0.885″
- Takedown still barely tight, nuts on barrel band 1/2 turn tighter: 0.675″
- Takedown tighter and fully snug, nuts on barrel band unchanged at 1/2 turn tighter: 0.524″
One thing that I noticed is that the tighter I went on the adjustments, the lower my point of impact on the target. That’s an easy fix because I have adjustable sights. I didn’t run these tests with and without the compensator, but I consider that issue pretty much settled because of my experience doing some serious fiddling. I’m happy with the results, because they’re at the limit of what I can see using open sights. So I’m putting a flat spot on the bottom of the stock for the adjustable barrel band, and after reinstalling and torquing, I’m putting on lock nuts to hold the setting. And then I’m shooting so that I get good at shooting. The rifle is done.
P.S. After it was all done, I had to include another picture of the ‘adjustable barrel band’. What I did, to make a flat place on the bottom of the stock for the strap to rest on, was use a hacksaw to cut straight backwards from the ‘nose’ of the forearm, on the underside. Meet that with a vertical cut, and there’s a flat spot for the ‘band’ to rest on. What this does is allow the U-bolt to move back against the edge where the original barrel band sat. Compare the pix above and below for a better idea of what I did. It makes quite a difference in the appearance, and I like the result. For lock nuts, I used cap nuts, to dress up the result a bit.

———footnotes—————
1. When some people say ‘action’, they mean the trigger group and receiver. For others, that term also includes the barrel. I’m one of the others — ‘action’ means all the basic working parts. The trigger group, receiver, and barrel. It doesn’t include the stock, bipod, flashlight, laser, sights, scope, trigger cable, muzzle brake, flash hider or zombie detector etc.
2. Barrel Tuner Analysis: Esten’s 22LR Rimfire Benchrest Rifle With and Without a Muzzle Tuner, FEA (Finite Element Analysis) of a 22 LR Rifle Barrel Dynamic Pressure Analysis, Varmint Al’s, http://www.varmintal.com/a22lr.htm (It shows you can definitely reduce rifle vibration with tuning, which is another way of showing how it’s good to reduce vibration.)
3. Ultra-RVC Barrel Bedding – Reactive Vibration Control Premium Gel Bedding Compound, Fire & Iron, http://www.fire-iron.biz/Fire___Iron_-_Ultra-R___Gri.html
4. Border Barrels, The Vibrations of a Barrel Tuned for Positive Compensation, http://www.border-barrels.com/articles/rimfire_accuracy/tuning_a_barrel.htm Note that the author disagrees with me, and says the notion of a ‘stopped’ barrel with no vibration-induced change in muzzle angle has “absolutely no basis in fact”. I disagree with him. If vibration reduces accuracy, reducing vibration is the answer. If you can do that with tuning, fine. Damping deserves respect, too.
5. Precision Shooting Magazine, I’m Feeling Those Good Vibrations, Again, http://ozfclass.com/articles/1/psm_2005_03.html According to the author, “A barrel tuner causes the muzzle to be free of any vibrations when the bullet exits it.” So damping should serve the same purpose.
6. Piller bedding vs Glass bedding, Shooter’s Forum, http://www.shootersforum.com/gunsmithing/47482-piller-bedding-vs-glass-bedding.html
7. See discussion, Forearm Bedding, Varmint Hunters, http://www.varminthunters.com/forum/archive/index.php/t-3202.html
8. Permatex® Ultra Black® Maximum Oil Resistance RTV Silicone Gasket Maker, http://www.permatex.com/products/product-categories/gasketing/gasket-makers/permatex–ultra-black–maximum-oil-resistance-rtv-silicone-gasket-maker-detail
9. What is Rifle Bedding? Terminal Ballistics Research, http://www.ballisticstudies.com/Knowledgebase/What+is+rifle+bedding.html

Pingback: Bedding and flyer issues... - Ruger Forum
Pingback: Ruger 10/22 Target Rocking in Stock - Ruger Forum
Pingback: Stock to barrel clearances,barrel bands,etc... - Ruger Forum
Pingback: Band on forearm - Ruger Forum
Pingback: Bedding - Page 2 - Ruger Forum
I shoot a 10/22 with a .920 stainless, button rifled, air gauged barrel in a Fajen laminated thumbhole stock with a true bedding pillar. I’ve done extensive trigger mods (including a roller bearing trigger return plunger to eliminate the drag of Mr. Ruger’s sliding (gritty) plunger and a pre-travel screw. First real performance comment: MY BARREL HAS A DEFINITE AMMO PREFERENCE! Winchester Wildcats shoot better than any match ammo I’ve tried. 100 yard head shots on rabbits/squirrels are the norm. My groups are still in one hole at 50 yards. Now, all that being said; will your bedding system improve my rifle? I’ve installed a Tac Sol barrel wedge to counteract the droop but still had to shim the base to enable zeroing. Curiosity has me in a death grip right now. I live for accuracy. Bill
Bill,
I think my method of rifle bedding would do a better job than the wedge for counteracting barrel droop, but on the other hand, your rifle is so accurate right now that I doubt you could measure any improvement.
My bedding system might improve your rifle — but what you have is so accurate that I doubt you could detect any difference. In fact, it’s more likely that you’d have to go out and find a different ammo preference for your rifle, which might not find something as nice as what you get with the Wildcats. Realistically, you’re probably at the point where you should be sharing with us your favorite recipes for squirrels and rabbits.
Bill here again. I neglected to mention that I torque the bedding screw to 25 inch/pounds. Bill
Hm. And on my favorite rifle, I don’t use a bedding screw at all. I’m not sure if I wrote this up, but I actually found that using the bedding screw screwed things up. My *receiver* is floated. But then, your barrel and mine are completely different… Feel free to play around, though!
Awesome article ive read it 3 times! I fully understand every thing you did. I will be trying it. The only thing im going to do is cut the new barrel band flat part that goes under instead of cutting the stock. Probly just grind the steel alittle. Thank you!